Creating a WhatsApp AI Assistant Using n8n: A Step-by-Step Guide
Build your own AI-powered WhatsApp chatbot using n8n, WhatsApp Business Cloud API, and OpenAI. This guide walks you through every step—from setup to testing—with real-world error handling, solutions, and an example production-ready workflow.
1. Introduction
Want to chat with an AI on WhatsApp? In this tutorial, you’ll learn how to build a WhatsApp AI Assistant using:
- n8n (automation tool)
- WhatsApp Business Cloud API
- OpenAI (for generating intelligent replies)
By the end, you’ll have a working chatbot and gain hands-on experience with APIs, webhooks, and automation.
2. Prerequisites
- n8n account (Cloud or self-hosted)
- Meta Developer account with WhatsApp Business Cloud API access
- OpenAI API key
- Basic understanding of APIs and webhook workflows
3. Registering Your WhatsApp Business App
A. Create WhatsApp App in Meta Developer
- Visit Meta for Developers
- Create a new app: choose Business → WhatsApp
- Link or create a WhatsApp Business Account
B. Obtain Testing Credentials
Your app dashboard will show:
- Test phone number
- Phone Number ID
- Temporary access token (valid for only 24 hours)
Tip: For long-term use, generate a 60-day system-user token later.
C. Add Recipients to Test List
By default, only approved numbers can receive messages:
- Navigate to WhatsApp → API Setup
- Add numbers in E.164 format (e.g.,
+923001234567) - Users must accept the invite via WhatsApp to become valid recipients
4. Configuring Your Webhook in n8n
A. Create a Webhook Node
- Method: GET (for initial verification)
- Endpoint example:
https://yourname.app.n8n.cloud/webhook/your-unique-id/webhook
B. Verify the Webhook with Meta
In your app’s Webhook section:
- Callback URL: your n8n webhook URL
- Verify Token: any secret string you choose (e.g.,
mySecret2025)
C. Echo Back Meta’s Challenge
Configure n8n’s Webhook node response:
| Field | Value |
|---|---|
| Response Mode | On Received |
| Response Body | {{$json["query"]["hub.challenge"]}} |
This ensures Meta can verify your endpoint successfully.
5. Processing Incoming Messages
WhatsApp sends JSON data with structure like:
{
  "entry": [
    {
      "changes": [
        {
          "value": {
            "messages": [
              {
                "from": "923001234567",
                "text": { "body": "Hello bot!" }
              }
            ],
            "metadata": {
              "phone_number_id": "698352170035199"
            }
          }
        }
      ]
    }
  ]
}
Extract:
from: user’s numbertext.body: user’s textmetadata.phone_number_id: correct sender ID
6. Integrating OpenAI for Responses
Obtaining Your OpenAI API Key
Before integrating OpenAI into your n8n workflow, you’ll need to get an API key from OpenAI.
Step-by-Step:
- Sign up or log in to OpenAI.
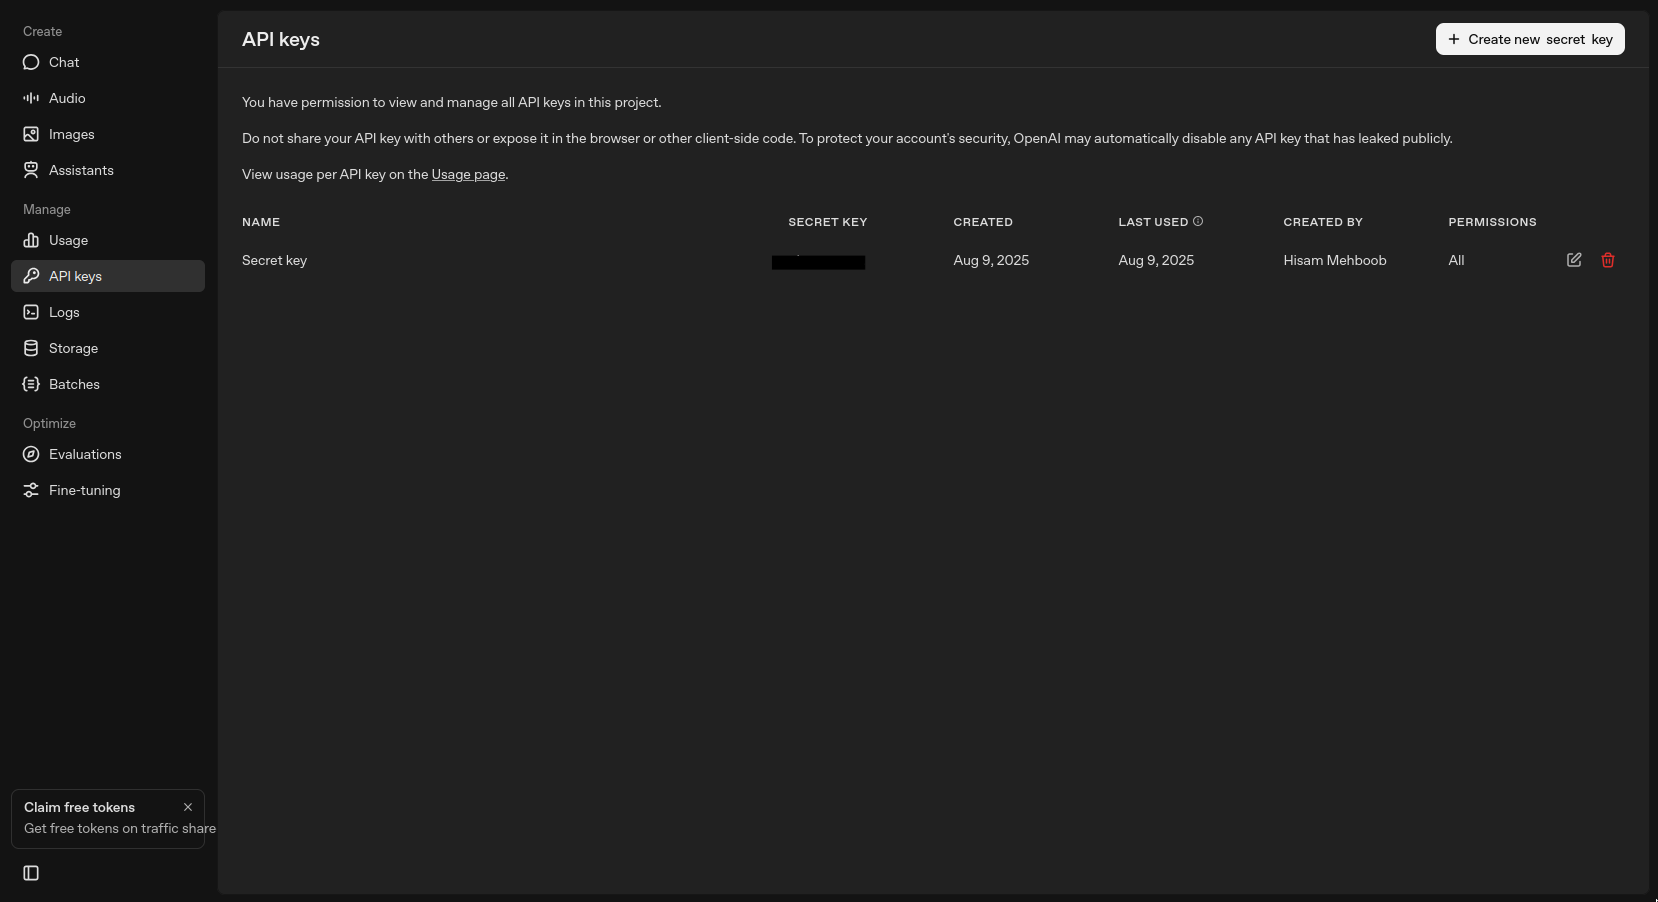
- Navigate to your API Keys page.
- Click “Create new secret key”.
- Optionally name your key, then copy it immediately (you won’t be able to view it again).
- In n8n:
- Go to Credentials → Add New → choose OpenAI or HTTP Request.
- Paste your API key into the key field.
- Save the credentials.
Security Tip: Keep your key private. Do not share it or commit it to public repositories.
Use an HTTP Request node to call OpenAI:
POST https://api.openai.com/v1/chat/completions
Authorization: Bearer YOUR_OPENAI_API_KEY
Content-Type: application/json

{
  "model": "gpt-4o-mini",
  "messages": [
    { "role": "system", "content": "You are a helpful WhatsApp AI assistant." },
    { "role": "user", "content": "{{ $json[...] }}" }
  ]
}
Replace {{ $json[...] }} with the actual path to the user’s message text from the Webhook node.
7. Sending Replies via WhatsApp
Use another HTTP Request node to respond:
POST https://graph.facebook.com/v21.0/{{ $json[...] }}/messages
Authorization: Bearer YOUR_LONG_LIVED_TOKEN
Content-Type: application/json

{
  "messaging_product": "whatsapp",
  "to": "{{ $json[...] }}",
  "text": {
    "body": "{{ $node['OpenAI Response'].json.choices[0].message.content }}"
  }
}
Use the metadata’s phone_number_id for the endpoint and from for the recipient. This avoids hardcoding and ensures proper routing.
8. Example n8n Workflow
Here’s the actual n8n workflow I used for my WhatsApp AI assistant. It integrates a product brochure PDF into a vector store for AI-powered Q&A, and handles WhatsApp message flow.
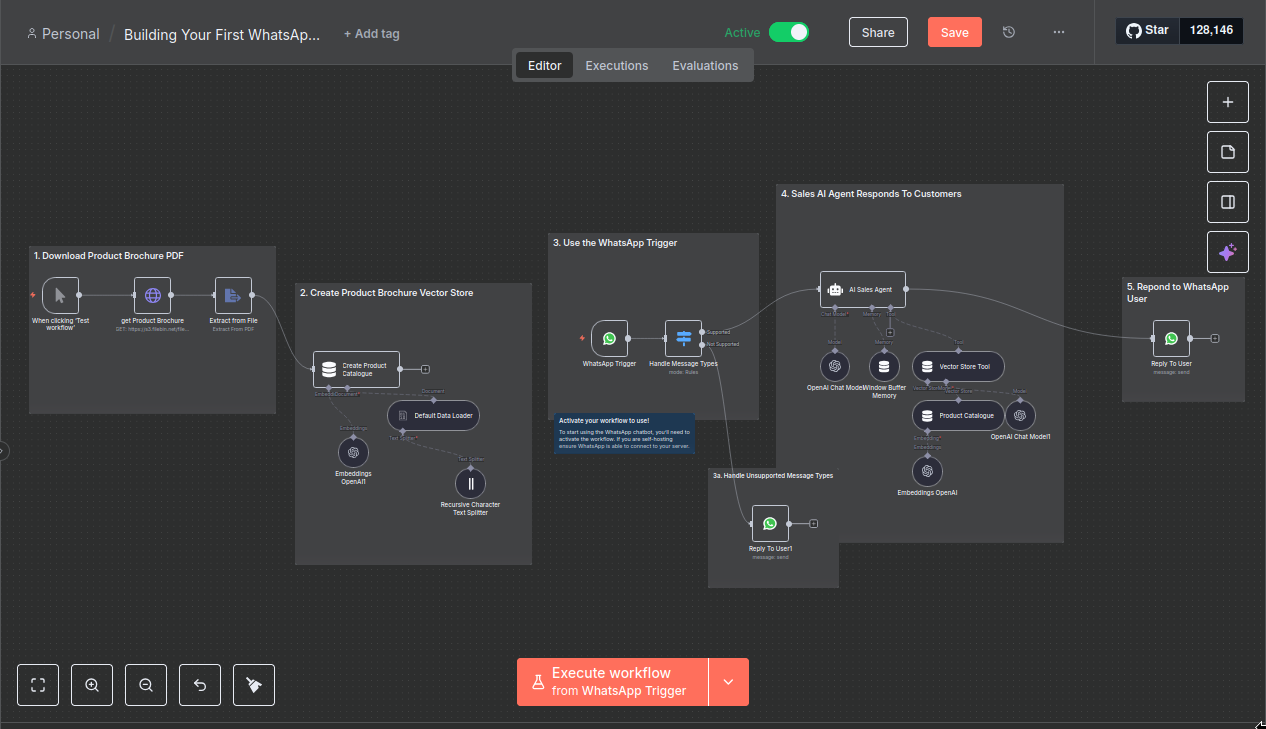
Step-by-Step Breakdown:
1. Download Product Brochure PDF
- Downloads the brochure from a given URL.
- Extracts text from the PDF.
2. Create Product Brochure Vector Store
- Splits large text into chunks.
- Generates embeddings using OpenAI.
- Saves them in a vector store for fast semantic search.
3. Use the WhatsApp Trigger
- Listens for incoming WhatsApp messages.
- Routes them to supported or unsupported handlers.
3a. Handle Unsupported Messages
- Replies with a friendly error if the message type is not text.
4. Sales AI Agent Responds
- Uses OpenAI with memory + vector store retrieval to answer based on brochure content.
5. Reply to WhatsApp User
- Sends the AI-generated message back to the sender.
Why this is effective:
- Context-aware answers via buffer memory.
- Reduced hallucinations thanks to vector store grounding.
- Smooth error handling for unsupported message types.
9. Common Errors & Fixes
Recipient phone number not in allowed list
→ Add as test number or switch to Live mode401 – Session expired
→ Refresh token via Graph API:GET https://graph.facebook.com/v21.0/oauth/access_token ?grant_type=fb_exchange_token &client_id=YOUR_APP_ID &client_secret=YOUR_APP_SECRET &fb_exchange_token=YOUR_CURRENT_TOKENWebhook verification failed
→ Ensure verify token matches between Meta and n8n and echohub.challengeNo execution data available
→ Trigger workflow via actual WhatsApp message, not manual run
10. Going Live
- Add a Privacy Policy URL in Meta App → Settings → Basic (required for live access)
- Switch app to Live mode once all compliance items are met
- Remove restricted recipient list
- Use WhatsApp message templates for messages sent after 24 hours of user interaction
11. Conclusion & Next Steps
Congrats! You now have a WhatsApp AI Assistant built with n8n and OpenAI.
Where to go from here:
- Wire up custom knowledge (PDFs, documents)
- Implement memory for conversation context
- Launch multilingual support
- Export n8n workflow as JSON for reuse
Need help? Join the n8n Community Forum or OpenAI Discord to connect with fellow builders.
Happy automating!